
If you ever need to hide a body, the 2nd page of Google search results is a great place to put it.
Did you know that between 91-95% of all Google searchers find what they are looking for on page 1 of Google’s search results?
Even though a better solution to their query may be found on page 2, only a very small slice of the internet will actually go there.

As a real estate agent who is trying to promote a listing – AKA your business’ bread & butter – you better be making damn sure that listing is appearing on page 1.
ESPECIALLY when you search for it by address!
Imagine this: your client’s listing (123 Fake St.) has been active on your real estate website for two weeks. Your client types their address into Google and hits Enter…
… on page 1 they find a number of results… all of which are links to websites that are featuring their listing (123 Fake St.) — but none of them – I repeat……. NONE OF THEM – are linking to the optimized listing on YOUR website.
The client is puzzled and frustrated now. They start clicking through page 2, page 3, page 4… they FINALLY found their listing on your website on PAGE 5 of Google’s search results.
This client is definitely NOT going to be impressed with your prowess in online marketing.
You’re going to look around to find someone to blame, and 9 times out of 10 you’re (unfortunately) going to blame your real estate website provider.
“Why aren’t my listings #1 on Google automatically!? My client is not pleased – neither am I.”
Well if your website provider is anything like us at RealtyNinja, then you know they want the best for you. They (we) are not out to sabotage your listings, quite the opposite — we know that your victories are our victories.
We want you to be successful online, we want your clients to find your listings on page 1 of Google and be proud that they listed with you…. and we want you to love your real estate website.
That’s why I’m writing this Step-by-Step guide today. If you follow this guide you’ll be setting up your listings for success. There are no guarantees in life or in SEO, but it doesn’t hurt to aim high ;)
Want to increase your chances of being found on Page 1? Do these things:
(Psst… download this entire guide as a handy PDF to read later)
Step 1: Load the listing onto your website
After loading your listing into the MLS® system for your board, it’s time to load the listing onto your website as well.
If you’re a RealtyNinja customer, this process is automated for you. Meaning, when you submit a listing to MLS®, that listing will be automatically appear on your RealtyNinja website.

If you are not a RealtyNinja customer, make sure your listing is imported from MLS® onto your real estate website so that you can customize and optimize the version located at www.yourwebsite.com.
Step 2: Customize the listing on your website
Google doesn’t know or care who the listing agent of a property is. Popular search engines just see each of your listings as a piece of content (consisting of a series of photos, a description, and some other info.)
Because of the MLS® reciprocity program (and MLS® programs like it) that same listing is now on THOUSANDS of other websites that use the same MLS® data feed.

In order to tell Google that the version of this listing on your domain is unique and thus worthy of “SEO juice,” we’ll have to customize it on your site. Steps 4 and on will go full-ninja on listing customization.
Step 3: Enhance listing photos on your website
The listing photos on MLS® are generally small and low res. The version of your listing on your website should feature HD photos.
First replace the default MLS® photos with larger, high resolution ones. Next, add even more photos than MLS® allows… give your web-listing the edge over MLS®.
And don’t forget to add captions for each photo — captions are read more often than descriptive paragraphs. Use captions on your listing photos.
Step 4: Add PDF documents
RealtyNinja customers have the ability to further optimize their listings on their website with PDF documents.

Have a floor plan you’d like to attach? Want to include a beautiful feature sheet? Important Strata documents to include?
These are all things that can be PDF-ized and attached to the newly optimized listing on your REALTOR® website.

Step 5: Add a unique and long-form description
This is such an obvious trick that is often ignored… Maybe you don’t know why it’s important… maybe you don’t know how… or maybe you’re just LAZY.
Take an extra 10 minutes and write some spectacular (or at least pretty good) sales copy for the new listing living on your website.
You will be rewarded by the search engine gods for writing 300 or more words. Long-form text descriptions will earn you more traffic to your website and listing.
Having a unique description for the listing on your website tells search engines that your web-listing is not duplicate content from MLS® (like the thousands of other real estate websites that are automatically pulling listing data from your board.)
Step 6: *** EPIC NINJA TIP *** Get thousands of backlinks to your listing
Speaking of those thousands of other real estate websites… wouldn’t it be awesome if you could get them ALL to link to your listing and your website?
Yes…. yes that would be awesome. Because relevant backlinks from other websites (especially popular websites) indicate to Google that your site is both trusted and well-recommended by others.
HOW IT’S DONE: You know the listing on your website that we’ve been enhancing? You want to COPY the URL for that listing (yourwebsite.com/listingXYZ,) then go to your MLS® account, log in, find the same listing and PASTE the URL you just copied as the “Virtual Tour URL” for the listing. Save or update the listing on MLS®.
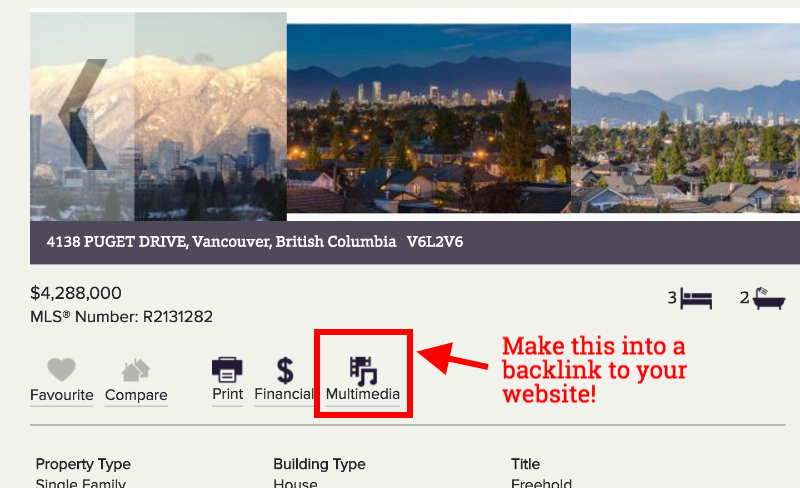
Now, all those thousands of other real estate websites are automatically providing your website (and specifically that listing) with a backlink. Do this for all of your listings consistently.
Caveat Emptor: This tip will make the listing on your website link back to itself when a visitor clicks “View Virtual Tour.” Make sure you customize your own listing with unique virtual tour link to avoid this.
Step 7: Load your listing video onto YouTube
If you haven’t created a video that tours or otherwise showcases your listing yet, you’re already failing at Step 8. If you haven’t created a video tour yet, you need to close your laptop right now and get on that before we continue…
Go to YouTube.com (the second largest search engine on the planet) and upload your listing video to your YouTube channel — make one if you don’t have one already.
When uploading the video to YouTube, you need to add a title. Here’s the formula to use for your YouTube video title:
Address of the Property + Property Type + “For Sale in” + MLS® Area
So now that your listing video on YouTube is titled something like “123 Fake St. North Vancouver BC, Single Family Home For Sale in Lower Lonsdale,” add a unique and proper description for that listing on the YouTube video as well.
In the description, include a link to the enhanced listing on your website – more backlinks!

[-_-]~~~ Ninja Tips: Don’t forget to tag your video with relevant keywords before publishing, to make it easier for your audience to discover on YouTube & Google. Also, add captions to your video if there is narration – great for SEO.
Step 8: Embed YouTube video into the listing on your website
When your listing video is done uploading and processing on YouTube, find the embed code and copy it. Check the GIF below to see where the YouTube video embed code is found.

Now that you’ve copied your embed code, you can use it to embed the video right into the enhanced listing page on your website. Return to the listing on your website and paste the code right into it… now visitors can watch the video right on the spot without having to open YouTube in a new browser tab (or leave your website!) #WINNING
If you’re a RealtyNinja website customer, this is how you embed a YouTube video into a listing.
Step 9: Set up a keyword rich page title for the listing
You a RealtyNinja customer? This step is done for you automatically.
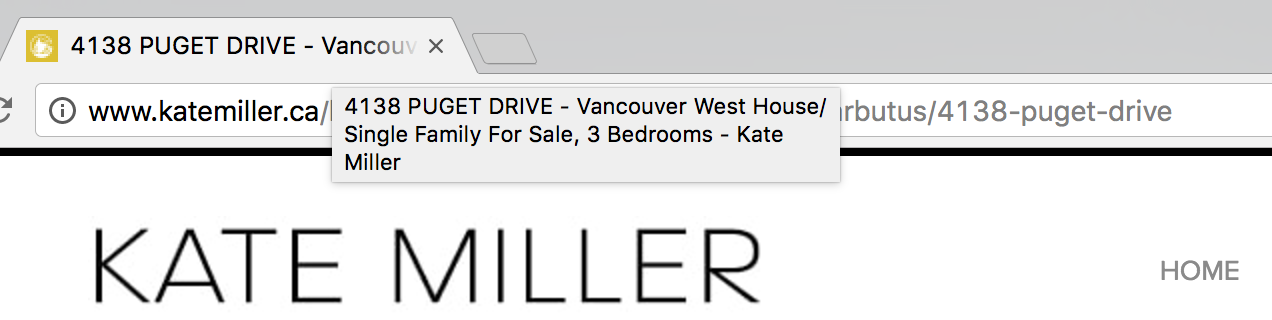
The page title is the linked text that appears up in Google results for any website. It’s also the text that appears in the browser tab for that listing. The formula we use at RealtyNinja for automatically generating listing page titles is very similar to the formula we used on YouTube titles… like almost exactly the same.

Before I continue, I just wanted to point out that Kate Miller is our customer, and a ninja rockstar REALTOR®. When you Google the address of her Puget Drive listing, her result appears on page 1, very close to the top. Be like Kate!
If you’re not a RealtyNinja customer (…that sucks bro) and you need to manually set a keyword rich page title, you can follow our recipe:
<title>123 FAKE STREET – North Vancouver Apartment/Condo For Sale, 2 Bedrooms – Your Name Here</title>
Skip the hassle and signup for an awesome RealtyNinja website now.
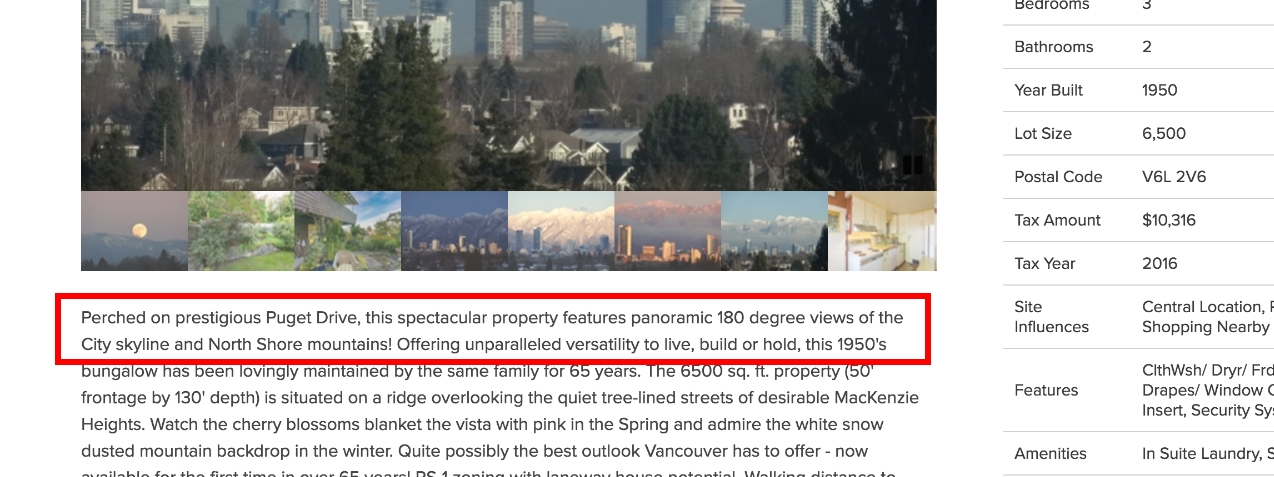
Step 10: Set up keyword rich meta description for the listing
You a RealtyNinja customer? This step is done for you automatically.
The meta description gives search engines a peek at what this page is about, and appears to searchers as a brief, 160 character blurb beneath your page title (Step 9.)

Continuing with Kate’s listing, you’ll notice her meta description matches the description written in her 4138 Puget Drive listing page.
Notice how Kate has mentioned the words “Puget Drive” in her description, as well as her title. This is a micro-optimization, but the duplication gives you some bonus Google-Juice.
If you’re not a RealtyNinja customer and need to set your own meta description, here’s the tag to use in the <HEAD></HEAD> section of your website (note – only modify the underlined area):
<meta name=”description” content=”This wonderful 2 bedroom home for sale in north vancouver is a true masterpiece, bla bla etc…” />
Step 11: Set up a keyword rich URL structure for the listing
You a RealtyNinja customer? This step is done for you automatically.
The way your URL is structured is important to search engines. Let’s do a little quiz. Which one of these two URLs make more sense to you:
- http://www.katemiller.ca/listings/view/117128/vancouver-west/arbutus/4138-puget-drive
— OR — - http://www.yoursite.com/23HDK98497X1YA234KLW53246093 &!%@14759.php?ref_129346kjnbsdkj
For the record, the second one doesn’t link to anything… I made it up and may have exaggerated it’s horrible format to make a point.
The point is, if YOU don’t know where a URL is going to take you simply by glancing at it, neither does Google.
If your listing URLs look more like the 2nd example, you need to figure this out with your website provider. When you talk to them, tell them “I want my URL structure to be like RealtyNinja,” and then show them this formula:
http://www.yoursite.com/listings/mls/MLSNUMBER/Area/Sub-Area/Address
Caveat Emptor: If you go and tell your website provider to update your URL structure, it’s like changing the locks of your house. None of the old keys will work again… meaning, none of the old links to your listing that are already out there on the internet are going to work – they will send people to a 404 Error page now. So keep this in mind before just flipping a switch and changing your entire website’s URL structure.
Step 12: Set up keyword rich meta keywords for the listing
You a RealtyNinja customer? This step is done for you automatically (aren’t we great?!)
Meta keywords are the ninjas of the meta world… you can’t see them.
That doesn’t mean they don’t have a part to play in the great battle for page 1 Google status. RealtyNinja customers get automated meta keywords set up for them based on a number of factors:
- Property Type
- MLS® Area
- Sub-Area
- Address
- Popular Keywords

Kate Miller’s 4138 Puget Drive listing would have an auto-generated, meta keyword tag in her site’s <HEAD></HEAD> code section that looks like this:
<meta name=”keywords” content=”House/Single Family, Vancouver West, Arbutus, listing, listings, mls, real estate, 4138 Puget Drive” />
Step 13: Feature the listing on your homepage
Your homepage is the most important page of your website according to Google. Stop squandering your potential for listing marketing here.
If you do not have your enhanced listing featured on your homepage somehow, do it for the love of god hurry up.
There are so many ways to promote the enhanced listing on your homepage… you could embed a photo from the listing and link that, you could use a button, include the listing in a carousel on your homepage, include it in your homepage slider.
However you do it, DO IT.
Step 14: Add the listing to your “Featured Listings” page
You should have a page on your website that is titled something like Featured Listings or Active Listings…
Add your enhanced listing into this page. I’m not going to bother going into much detail about this. Just trust me and do it.

Also, if you’re a RealtyNinja customer, this is done for you automatically (you just enter your Agent ID in the settings.)
Step 15: Blog about the listing
Now that your listing is totally polished, optimized, enhanced, and generally supercharged, there’s one more thing to do.
BLOG IT.
I’m not sure what that means to you in particular, but I’ll tell you what it shouldn’t mean:
If your idea of blogging about the listing is writing “Just listed 123 Fake Street – Check it out” and then adding a link to the listing………. your blog post sucks.

Remember: people don’t care about you, they care about them. They don’t care about your listing, they care about what your listing means to them — what it can do for THEM!
With that in mind, try writing out a proper introduction to the property — doesn’t have to be long or take long — include a photo or two, some property details, embed the listing video, and then link to it from the blog post.
[-_-]~~~ Ninja Tip: When you blog about the enhanced listing, make sure to include ALT tags on the photos you add. The ALT tags should contain the listing address, followed by property type and area.
Congratulations, you just took care of 15 very important listing enhancements that will poise your listings for SEO success.
These 15 improvements are great stuff, but they are also ON PAGE SEO… meaning they are changes made ON your website that will help you rank better.
If your domain is brand new or doesn’t have much authority or history, then you’ll also need to engage in some OFF PAGE SEO.
Here are some off page SEO tactics that will also help make you a better real estate marketer in the digital era:
- Share the listing on social media,
- Advertise (or) boost the listing on social media,
- Run a Google AdWords campaign, especially if its an expensive property,
- Write guest blog articles for other sites with backlinks to the enhanced listing on your site,
- Get it up on local real estate sites or portals (craigslist, etc.) and backlink to the enhanced listing on your website,
- Include a link to the enhanced listing in an email to your mailing list,
- Etc. (watch our top 10 SEO checklist for REALTORS® video)
A couple of quick notes before I let you go and start optimizing your own listings…
This article has been completely focused on things you can do ONLINE to improve the SEO of a listing. There’s still a boatload of tactics you can/should do OFFLINE to market the listing.
Nobody has total control over SEO… there are no switches to flick or buttons to press that will take you to page 1. The tips I’ve outlined in this step-by-step listing marketing guide are all very helpful — that doesn’t mean they are going to work overnight.

Your website’s reputation with search engines does not increase in minutes, hours, or even every day necessarily. Think of your SEO rank like your credit score… it takes a long time to build it up – you must consistently pay your bills on time, etc.
Like your credit, optimizing your website and listings for search engines can take a while, but screwing them up is very easy. I hope this article reminds you not to miss any more “SEO payments” ;)
Thanks Ninjas, and if you made it all the way through this article, let me know your feedback and questions in the comments below.


